Ball joints are an essential component of a vehicle's suspension system. These small yet vital parts connect the control arms to the steering knuckles, allowing the wheels to move smoothly while maintaining proper alignment. Over time, ball joints can wear out due to constant stress from driving, leading to problems with handling and safety. In this comprehensive guide, we’ll show you how to replace ball joints, outline the tools required, and provide important tips for completing the job yourself, so you can maintain the performance and safety of your vehicle.
What Are Ball Joints and Why Are They Important?
Definition of Ball Joints:
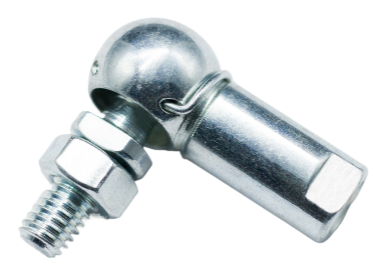
A ball joint is a spherical bearing that connects the control arm of the vehicle’s suspension to the steering knuckle, allowing the wheel to move up and down and turn left and right. It acts as a pivot point for the suspension system.
How Ball Joints Function:
Ball joints serve as pivot points between the suspension and the wheels. They allow for vertical movement of the suspension, while simultaneously allowing steering input. Depending on the vehicle’s design, the ball joints can be located either at the top (upper) or bottom (lower) of the suspension, each performing different functions.
Types of Ball Joints:
Upper Ball Joints: These are typically found in vehicles with a double-wishbone suspension system. They help in maintaining alignment and contribute to the smooth pivoting motion necessary for steering.
Lower Ball Joints: Located at the bottom of the suspension, lower ball joints bear more weight and are crucial for supporting the vehicle’s load. They are more stressed than upper ball joints and are found in both double-wishbone and MacPherson strut suspensions.
The Importance of Ball Joints:
Ball joints maintain proper wheel alignment, allow the suspension to absorb bumps, and support the vehicle’s handling and steering. Without properly functioning ball joints, the vehicle’s suspension system would lose its integrity, affecting safety and performance.
Signs Your Ball Joints Need Replacing
Symptoms of Worn-out Ball Joints:
Clunking or popping sounds: If you hear clunking or popping sounds when driving over bumps or making turns, it could indicate that the ball joints are worn and no longer functioning correctly.
Uneven tire wear: Bad ball joints can cause the tires to wear unevenly due to misalignment, which can lead to more expensive repairs like replacing tires prematurely.
Poor steering response: If the steering feels loose, sloppy, or you notice difficulty in turning the steering wheel, your ball joints might be contributing to the problem.
Vibration in the steering wheel: Worn-out ball joints can cause vibrations in the steering wheel while driving at high speeds.
How to Check Ball Joints:
Tire Movement Test: Safely jack up the vehicle and secure it with a jack stand. Lift the wheel slightly and grab it at the 5 o'clock or 8 o'clock position. Try to move the tire back and forth. If there is any noticeable movement or clicking, the ball joint could be worn.
Pry Bar Test: Use a crowbar or pry bar to gently pry between the steering knuckle and the ball joint. Any movement or slop indicates the ball joint is no longer functioning correctly.
What Happens If You Ignore Bad Ball Joints?:
If left unchecked, worn ball joints can lead to more severe issues, such as the ball joint separating from the socket, which could cause the wheel to detach from the vehicle. This can result in catastrophic damage or even cause accidents, making it essential to address ball joint problems promptly.

Tools and Equipment You’ll Need to Replace Ball Joints
Essential Tools:
Ball Joint Press: This is a specialized tool used to press out the old ball joint and install the new one. It ensures a tight and secure fit.
Pickle Fork and Hammer: A pickle fork is used to separate the ball joint from the control arm or steering knuckle with a hammer.
Wrench Set: A set of wrenches is necessary for removing bolts and securing parts.
Socket Set: Both deep and shallow sockets will be needed for various fasteners.
Torque Wrench: Ensures that bolts are tightened to the manufacturer’s specifications, which is crucial for safety.
Pry Bar: Used to apply force to separate parts or check for slack in the ball joint.
Snap Ring Pliers: These are required if snap rings are used to secure the ball joint.
Floor Jack and Axle Stands: For lifting and safely supporting the vehicle while you work.
Safety Gear:
Gloves: To protect your hands from sharp parts and ensure a firm grip.
Eye Protection: Always wear safety glasses to protect your eyes from debris that could fly out while using tools.
Proper Lifting Equipment: Always use a floor jack and secure the vehicle with axle stands to prevent injury.
How to Replace the Ball Joints: Step-by-Step Instructions
Step 1: Prepare Your Vehicle
Lifting the Vehicle Safely: Begin by parking your vehicle on a level surface and engaging the parking brake. Lift the vehicle using a floor jack and secure it with jack stands to prevent any accidents.
Removing the Wheels: Once the vehicle is safely lifted, remove the wheels to expose the suspension and ball joints.
Step 2: Separating the Ball Joint
For Front-Wheel Drive Cars: Use a ball joint fork to separate the lower control arm from the steering knuckle. The ball joint press may be required for more stubborn parts.
For Trucks and Some Cars: You may need a bigger hammer and more force to break the ball joint free from the steering knuckle. Ensure you’re applying force in a safe manner to avoid damage to the surrounding components.
Dealing with Snap Rings: If your ball joint is secured with snap rings, carefully remove them using snap ring pliers.
Step 3: Removing the Old Ball Joint
Using a Ball Joint Press: For most vehicles, the ball joint press will help remove the old ball joint from the control arm. Apply pressure slowly to press it out.
If the Joint is Bolted: If the ball joint is bolted onto the control arm, unbolt it and remove the fasteners using a wrench or ratchet.
Handling Hot-Rivets: If your ball joint is secured with hot rivets, you may need to use a cut-off wheel or torch to remove them before you can replace the ball joint.
Step 4: Installing the New Ball Joint
Pressing the New Ball Joint In: Insert the new ball joint into the control arm using the ball joint press. Ensure the joint is positioned correctly and that it fits snugly.
Freezing the New Ball Joint: For easier installation, consider freezing the new ball joint overnight. The cold will make the joint contract, making it easier to fit into place.
Bolt-on Installation: For bolt-on joints, simply align the new ball joint with the control arm and use a torque wrench to tighten the bolts to the specified torque.
Step 5: Reassembling Your Vehicle
Reinstalling the Steering Knuckle: After the ball joint is installed, reattach the steering knuckle, ensuring all parts are securely in place.
Reattaching the Wheel: Once everything is assembled, reinstall the wheel, ensuring it’s properly torqued.
Lowering the Vehicle: Lower the vehicle back to the ground, remove the jack stands, and ensure everything is reassembled properly.
How Long Does it Take to Replace Ball Joints?
Replacing a ball joint typically takes 1 to 2 hours per joint. If you're replacing both joints on one side, expect to spend 3 to 5 hours. The time can vary depending on the vehicle type, the tools available, and your experience level.
Can I Replace My Ball Joints Myself?
Replacing ball joints is not an overly complicated task, but it does require some mechanical skills. If you're comfortable working with suspension components and have the proper tools, you can likely perform this repair yourself. However, if you're not confident in your skills or the job seems too complex, it’s a good idea to consult a professional mechanic.
Common Challenges When Replacing Ball Joints
Stuck Ball Joints: Ball joints can sometimes become seized due to rust and dirt, making them difficult to remove. In these cases, extra force or penetrating fluid may be needed.
Rivets That Need to Be Cut: Some older vehicles use rivets to secure the ball joints. These must be cut off with specialized tools, such as a cut-off wheel or torch.
Special Vehicle Considerations: Some vehicles, like 4x4 trucks, may have specialized suspension systems that make ball joint replacement more difficult.

Conclusion
Replacing ball joints is a crucial maintenance task for ensuring the safety and performance of your vehicle. By following this step-by-step guide and using the correct tools, you can complete the job yourself and save on repair costs. Always remember to consult your vehicle's repair manual and seek professional help if needed.
FAQs About Replacing Ball Joints
Q: What are the signs that a ball joint needs to be replaced?
A: Signs include clunking sounds, uneven tire wear, poor steering response, and vibrations in the suspension.
Q: Can I replace a ball joint myself?
A: Yes, as long as you have the necessary tools and experience. If the task feels overwhelming, seek professional help.
Q: How often should ball joints be inspected or replaced?
A: Ball joints should be inspected every 12,000 to 15,000 miles and replaced if they show signs of wear.
Q: What tools are necessary for replacing a ball joint?
A: A ball joint press, pry bar, socket set, and torque wrench are essential for completing the job.
Q: How long does it take to replace a ball joint?
A: It typically takes 1 to 2 hours per ball joint, but more time may be required for difficult-to-remove joints.


